Best Raspberry Pi Remote IoT Free: Your Ultimate Guide To Unleashing Power
Imagine this: you're sitting in your cozy living room, sipping coffee, and suddenly you get a notification. Your home security camera just detected movement. But here's the twist—you didn’t spend thousands on expensive smart home systems. Instead, you built it yourself using a Raspberry Pi and some clever coding tricks. Welcome to the world of Raspberry Pi Remote IoT, where creativity meets technology.
This isn't just about setting up a cool gadget; it's about creating a fully functional remote IoT system that doesn't break the bank. The beauty of Raspberry Pi is its flexibility and affordability, making it the perfect platform for hobbyists and professionals alike. Whether you're building a weather station, automating your home, or monitoring remote sensors, Raspberry Pi has got your back.
In this article, we'll dive deep into the best Raspberry Pi Remote IoT setups that are completely free. We'll explore how you can harness the power of open-source software, avoid costly subscriptions, and still achieve professional-grade results. Ready to transform your Raspberry Pi into a powerhouse of automation? Let's get started!
- Moviejoyto Your Ultimate Destination For Streaming Movies And Series
- Movies4uexpress Your Ultimate Destination For Streaming Movies Online
Table of Contents
- What is Remote IoT?
- Raspberry Pi Basics
- Why Free is the Way to Go
- Setting Up Your Raspberry Pi
- Choosing the Right Software
- Top IoT Projects for Raspberry Pi
- Securing Your IoT System
- Troubleshooting Tips
- Community Support
- Conclusion
What is Remote IoT?
Let's start with the basics. Remote IoT (Internet of Things) refers to connecting devices over the internet, allowing them to communicate and interact without physical intervention. Think of it as giving your devices a voice and letting them talk to each other. With Raspberry Pi, you can create a network of smart devices that you control remotely, no matter where you are.
Now, why does this matter? Well, imagine being able to check your home’s temperature from work, adjust your smart lights, or even monitor your garden’s soil moisture levels. These aren't just fancy features—they're practical solutions that make life easier. And the best part? You can do all this for free using Raspberry Pi and open-source tools.
Why Use Raspberry Pi for Remote IoT?
Raspberry Pi is like the Swiss Army knife of tech enthusiasts. It's compact, affordable, and packed with potential. Here's why it's the go-to choice for remote IoT projects:
- Lookmovie Foundation Alternative Your Ultimate Guide To Legal Streaming Options
- Topnotch Movie4ktonet Alternatives To Stream Movies In 2023
- Versatility: From simple automation tasks to complex data analysis, Raspberry Pi can handle it all.
- Community Support: A massive community of developers and hobbyists means tons of resources and tutorials at your fingertips.
- Cost-Effective: You don't need to invest in expensive hardware or software. With Raspberry Pi, you can build powerful systems without breaking the bank.
Raspberry Pi Basics
Before we dive into the nitty-gritty of setting up your Raspberry Pi for remote IoT, let's cover some basics. If you're new to Raspberry Pi, don't worry—it's easier than you think.
Raspberry Pi comes in several models, each with its own set of features. For most remote IoT projects, the Raspberry Pi 4 Model B is a great choice. It offers enough processing power and connectivity options to handle even the most demanding tasks.
What You'll Need
Here's a quick list of essentials to get started:
- Raspberry Pi board (preferably Raspberry Pi 4)
- MicroSD card (at least 16GB)
- Power supply (official Raspberry Pi power adapter recommended)
- Wi-Fi or Ethernet connection
- HDMI monitor (optional, for initial setup)
Once you have these, you're ready to roll. But wait—there's more!
Why Free is the Way to Go
Why choose free software for your Raspberry Pi Remote IoT projects? Simple: freedom and flexibility. Open-source software gives you the freedom to modify, adapt, and expand your projects without worrying about licensing fees or restrictive terms.
Plus, there's a wealth of knowledge out there. Communities like GitHub, Reddit, and Stack Overflow are filled with developers sharing their expertise and helping others. It's like having a global team of experts working with you for free.
Benefits of Using Free Tools
- No recurring costs
- Access to a vast library of plugins and add-ons
- Regular updates and improvements from the community
- Customizability to fit your specific needs
So, not only are you saving money, but you're also getting a system that's tailored to your exact requirements. Win-win, right?
Setting Up Your Raspberry Pi
Now that you've got your hardware ready, it's time to set up your Raspberry Pi. This is where the magic begins.
First, you'll need to install an operating system on your MicroSD card. The most popular choice is Raspberry Pi OS, which is specifically designed for Raspberry Pi boards. You can download it from the official Raspberry Pi website and use a tool like Etcher to flash it onto your MicroSD card.
Initial Configuration
Once your OS is installed, boot up your Raspberry Pi and follow the initial setup wizard. Here are a few things to configure:
- Set up Wi-Fi or Ethernet connection
- Change default password for security
- Update the system using `sudo apt update` and `sudo apt upgrade`
With your Raspberry Pi up and running, you're ready to start exploring the world of remote IoT.
Choosing the Right Software
Selecting the right software is crucial for your Raspberry Pi Remote IoT project. Luckily, there are plenty of excellent options available, all for free.
Popular Software Choices
- Node-RED: A visual tool for wiring together hardware devices, APIs, and online services. Perfect for creating complex workflows without writing tons of code.
- Home Assistant: A powerful home automation platform that integrates with thousands of smart devices. Great for building comprehensive IoT systems.
- Mosquitto: An open-source MQTT broker that allows devices to communicate securely over the internet.
Each of these tools has its own strengths, so choose based on your project's requirements and your comfort level with coding.
Top IoT Projects for Raspberry Pi
Now for the fun part—projects! Here are a few ideas to get you started:
1. Smart Home Automation
Control your lights, thermostat, and other smart devices from anywhere. Use Home Assistant to create a centralized hub for all your home automation needs.
2. Weather Station
Monitor temperature, humidity, and other environmental factors using a Raspberry Pi and a few sensors. Perfect for gardeners or weather enthusiasts.
3. Security Camera System
Set up a network of security cameras and stream the footage to your smartphone. With MotionEyeOS, you can create a professional-grade system without spending a fortune.
These are just a few examples, but the possibilities are endless. Let your imagination run wild!
Securing Your IoT System
Security is a top priority when it comes to remote IoT systems. After all, you don't want hackers gaining access to your smart home or sensitive data.
Here are a few tips to keep your system secure:
- Use strong, unique passwords for all devices and accounts
- Enable encryption for data transmission using SSL/TLS
- Regularly update your software to patch vulnerabilities
- Limit access to your IoT devices by configuring firewalls and access controls
By taking these precautions, you can enjoy the benefits of remote IoT without compromising on security.
Troubleshooting Tips
Even the best-laid plans can hit a snag. Here are a few troubleshooting tips to help you overcome common issues:
- Check your network connection if devices aren't communicating
- Review logs for error messages using `sudo journalctl -xe`
- Ensure all software is up to date
- Reboot your Raspberry Pi if things aren't working as expected
Remember, troubleshooting is part of the process. Don't get discouraged if things don't work the first time. Keep experimenting and learning—that's what makes Raspberry Pi projects so rewarding.
Community Support
One of the best things about Raspberry Pi is its vibrant community. Whether you're stuck on a problem or looking for inspiration, there's always someone willing to help.
Join forums like Reddit's r/raspberry_pi or Stack Overflow to connect with other enthusiasts. You can also find tons of tutorials and guides on YouTube and blogs. The more you engage with the community, the more you'll learn and grow.
Conclusion
We've covered a lot of ground in this article, from understanding Remote IoT to setting up your Raspberry Pi and choosing the right software. By leveraging the power of free, open-source tools, you can create amazing projects that enhance your life and save you money.
Remember, the key to success in Raspberry Pi Remote IoT projects is experimentation and persistence. Don't be afraid to try new things and learn from your mistakes. The more you practice, the better you'll become.
So, what are you waiting for? Grab your Raspberry Pi, fire up your favorite software, and start building the IoT system of your dreams. And don't forget to share your creations with the community. Who knows—you might inspire someone else to embark on their own Raspberry Pi journey!
- Multimovies Website Your Ultimate Destination For Movie Buffs
- 1movierulzhd Your Ultimate Guide To Stream Movies Online
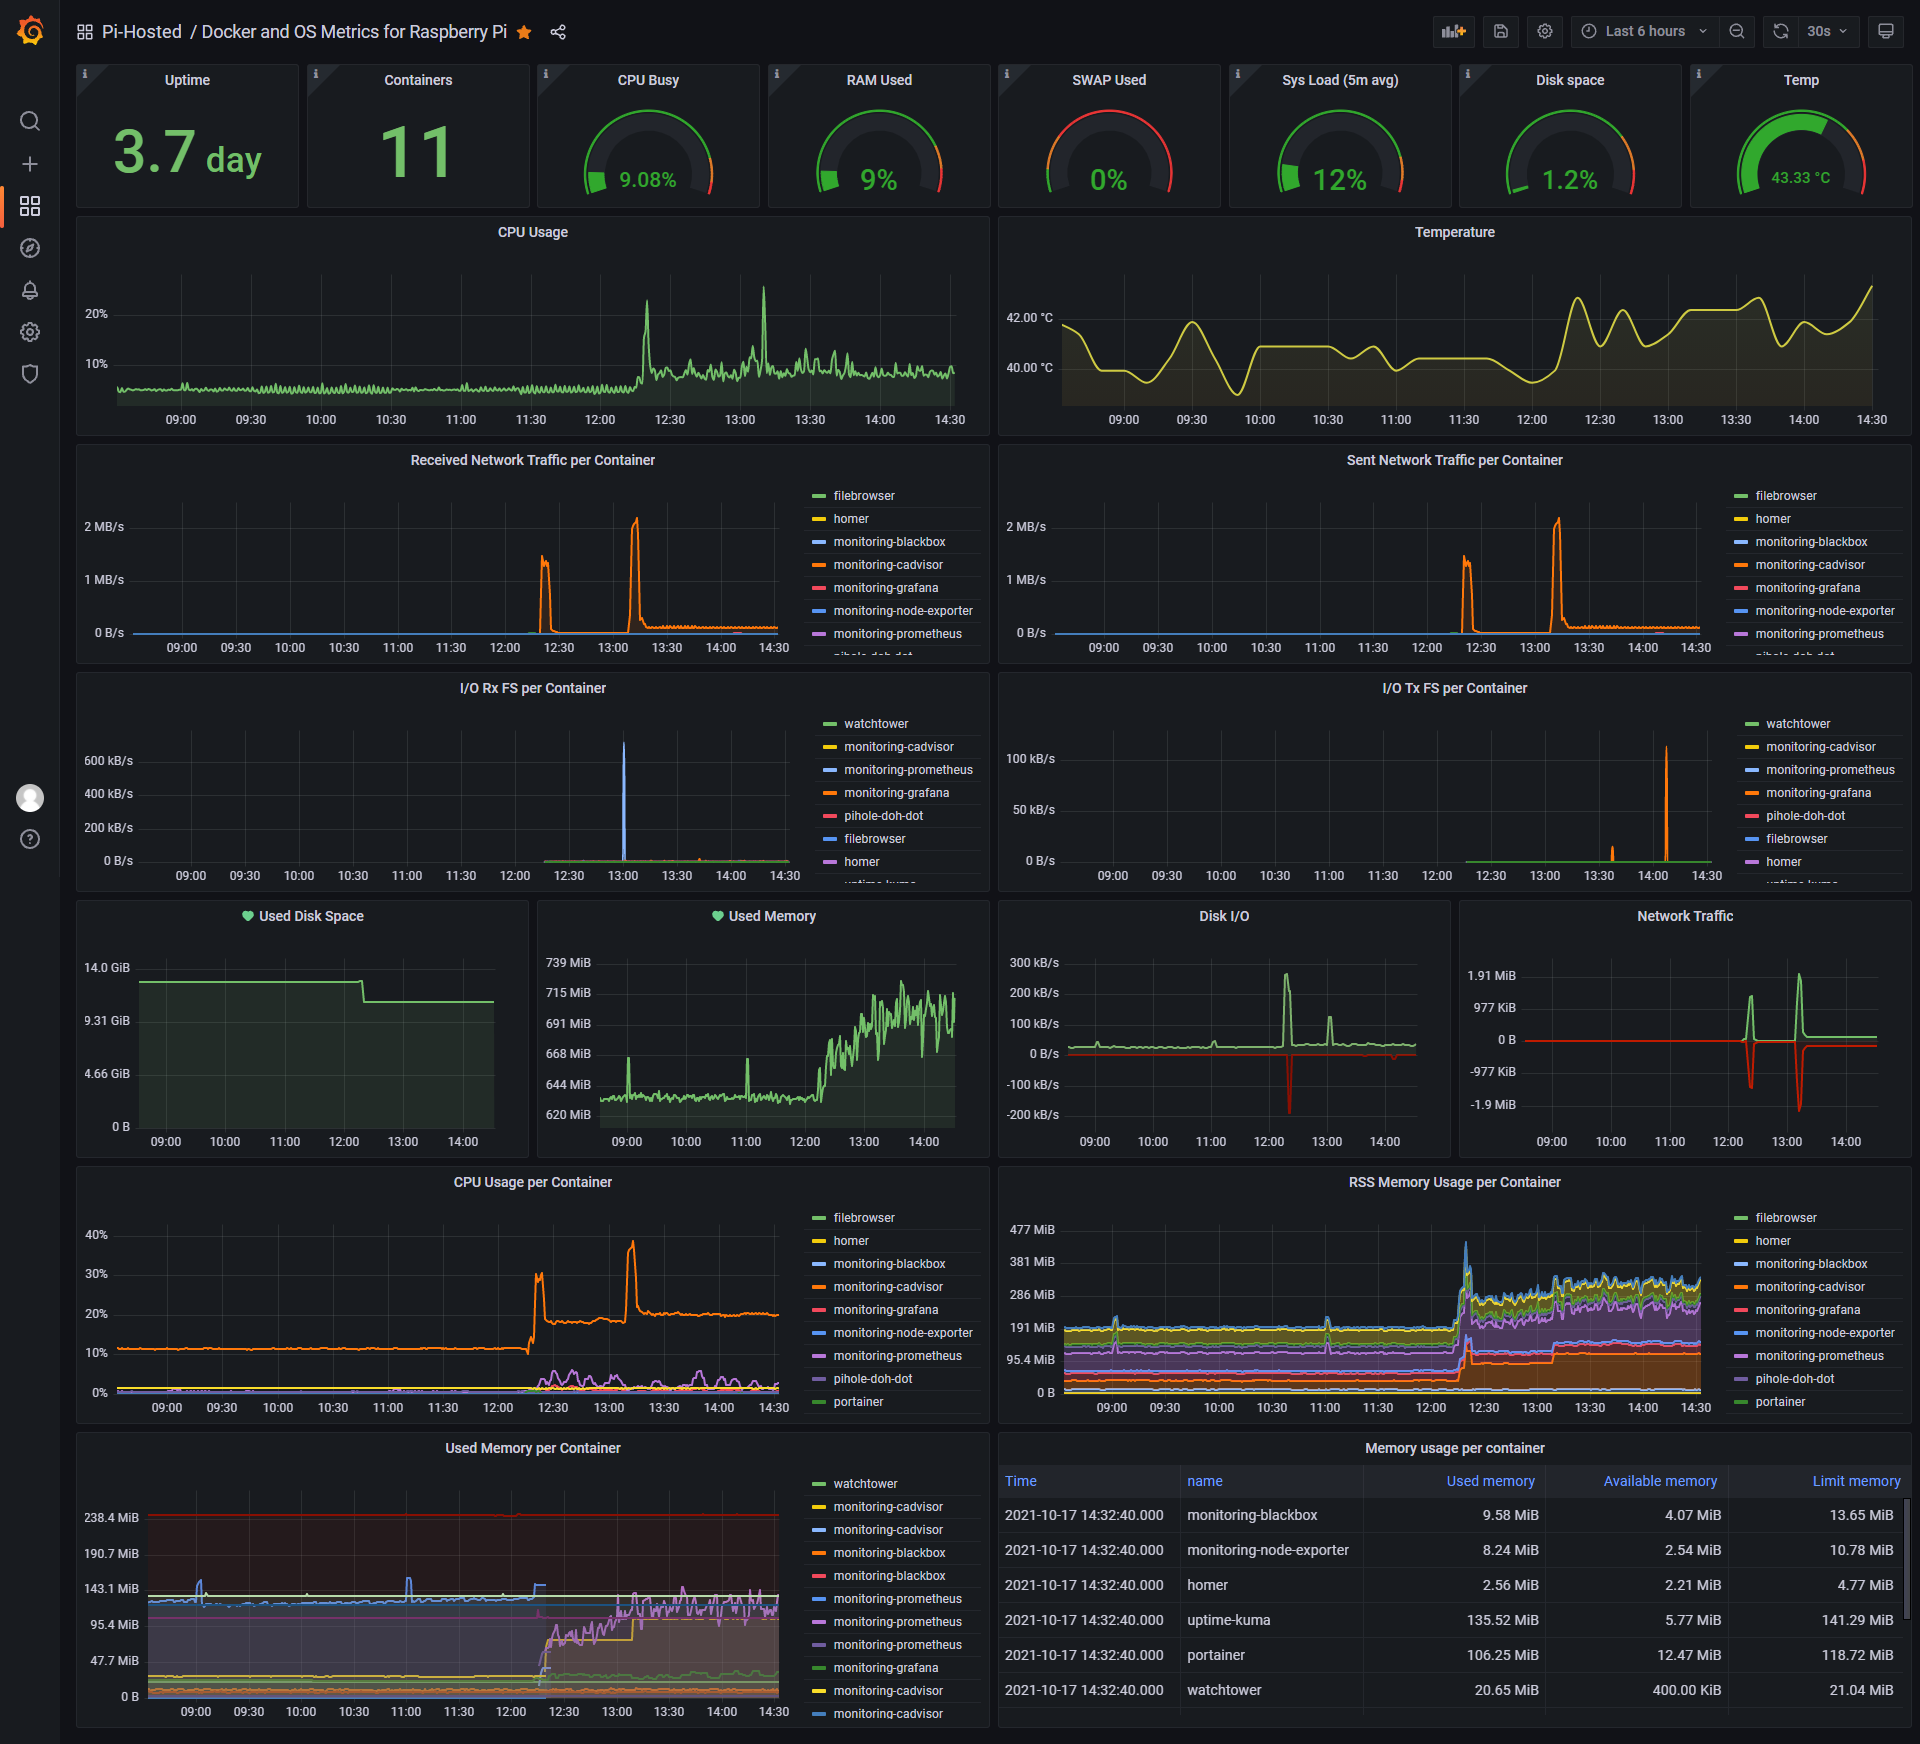
Raspberry Pi Remote IoT Monitoring Setup & Best Practices
Best Remote IoT Platform Free For Raspberry Pi Unlocking Innovation

Best Remote IoT Platform Free For Raspberry Pi Unlocking Innovation
